
How to Connect the EDL3 to a Vehicle
Once you have installed the EDL3 drivers, you are ready to connect the john deere edl v3 to a vehicle using an adapter cable. The following adapter is included in the EDL3 kit:
• W1 9-pin Deutsch adapter Next, you connect the EDL3 to your PC using one of the following options:
•A wired, USB connection
•A wireless, Bluetooth® connection
— Connecting via a Class 1, external Bluetooth® adapter (recommended)or
— Connecting via Integrated Bluetooth®
•A wireless Wi-Fi connection —Mini Access Point Mode or
— Infrastructure Mode
1.Making a Wired USB Connection
To connect the EDL3 to your PC using a USB cable:
(1)Connect the USB cable (i.e., an automotive A to Mini-B USB cable) to the USB port of the PC or laptop.
(2)Connect the other end of the cable to the port on the bottom of the device.
(3)Connect the DB26 female end of the appropriate adapter cable to the EDL3.
(4)Attach the other end of the adapter cable (i.e., the Deutsch connector end) to the vehicle’s diagnostic connector.
NOTE:The vehicle’s diagnostic connector is typically located under the dash-board on the driver’s side, or beside the driver’s seat. It can also be located in the engine compartment, near the electronic control module (ECM). Your device is ready to use.
2.Making a Wireless Bluetooth Connection
NOTE:The EDL3 factory default is Bluetooth® mode in a Non-Discoverable status. To confirm that the device is in Bluetooth® mode, press the Reset button momentarily and the Wireless LED will illuminate blue.
The EDL3 is equipped with a Class 1 Bluetooth® module with a range of up to 100m when communicating with another Class 1 Bluetooth® device. Most PCs that feature Integrated Bluetooth® are equipped with a Class 2 Bluetooth® module, which limits the useful range to around 10m. For maximum wireless range, the use of an external, Class 1 USB Bluetooth® adapter (sold separately) is recommended.
There are two connection options:
• Connecting via a Class 1, external Bluetooth® adapter (recommended)
• Connecting via Integrated Bluetooth®
The procedure for connecting via Integrated Bluetooth® is much the same as connecting via an external Bluetooth® adapter. To connect using your PC’s Integrated Bluetooth®, skip Steps 3 and 4 on page 33 of the following procedure.
3.Connecting via a Class 1, External Bluetooth Adapter
If you decide to employ an external, Class 1 USB Bluetooth® adapter, you will have to perform the following tasks:
• Disable your PCs Integrated Bluetooth® device
• Install the drivers supplied with the external adapter, if required
NOTE:Depending on the Bluetooth® adapter you are using for your wireless connection, you may need to install the necessary Bluetooth® drivers. For
some adapters the drivers will install automatically.
• Connect the EDL3 to a vehicle
• Pair the EDL3 with your PC (pg. 34)
To connect via an external Bluetooth adapter:
(1)Click on the Show Hidden Icons arrow in your PC’s System Tray.
To-connect-via-an-external-Bluetooth-adapter-1
(2)Right-click on the Bluetooth® icon .
NOTE:If your PC has Integrated Bluetooth, skip Steps 3 and 4 and move on to Step 5.
(3)Click on Turn Adapter Off (option may not be available in all configurations).
(4)Plug the Class 1 Bluetooth® adapter you have selected into an available USB port on your PC, and wait while Windows® installs the required drivers.
NOTE:Depending on the Bluetooth® adapter you are using for your wireless connection, you may need to install the necessary Bluetooth® drivers. For some adapters the drivers will install automatically.
The following message is displayed:
Installing device driver software.
When the installation is complete, the following message is displayed:
Your device is ready to use.
NOTE:Some Bluetooth® adapters may require you to configure a Bluetooth® environment. If this is necessary, an Initial Bluetooth Configuration Wizard screen will display at the conclusion of the adapter installation process. If this happens, use the CD that came with the adapter.
(5)Connect the DB26 female end of the appropriate adapter cable to the EDL3.
(6)Attach the other end of the adapter cable (i.e., the Deutsch connector end) to the vehicle’s diagnostic connector.
NOTE: The vehicle’s diagnostic connector is typically located under the dashboard on the driver’s side, or beside the driver’s seat. It can also be located in the engine compartment, near the electronic control module
(ECM).
—At this point, the Power LED (green) on the EDL3 should be illuminated (on).
—If the Power LED is not illuminated, turn the vehicle’s key to the ON position, leaving the engine off
(7)Press and hold the Reset Button until the Wireless LED begins to flash blue (about 3 seconds).
This will put the EDL3 in Discoverable Mode. When the EDL3 is Discoverable, a host device can detect, pair, or connect to it. Once a connection is established, the LED turns solid blue. After two minutes, discoverability will time out, and the device will go back to Non-Discoverable status.
NOTE:See Device Features in Chapter 2 of this manual for a detailed discussion of the Reset Button.
(8)Move on to Pair the Device, next in this manual.
4. Pair the Device
You use the Windows® utility to pair the device (i.e., the EDL3 with your PC).
To pair the device:
(1)Click on the Show Hidden Icons arrow in your PC’s System Tray.
The hidden icons are displayed.
(2)Right-click on the Bluetooth® icon .
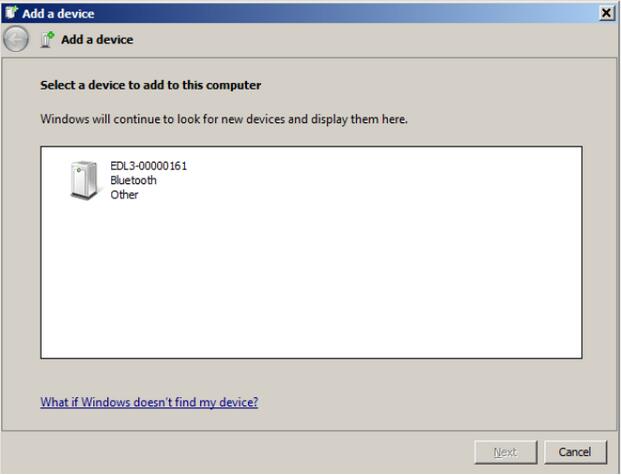
(3)Click Add a Device.
The Add a device screen is displayed.
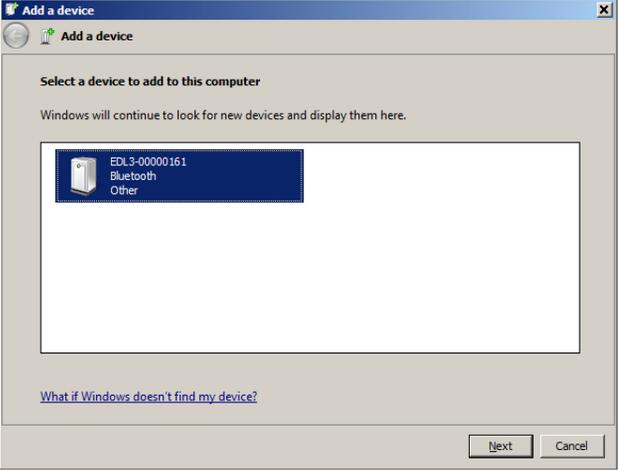
(4)Select the device displayed that matches the serial number on the back of your EDL3 (e.g., EDL3_xxxxxx).
Your selection is highlighted.
(5)Click Next.
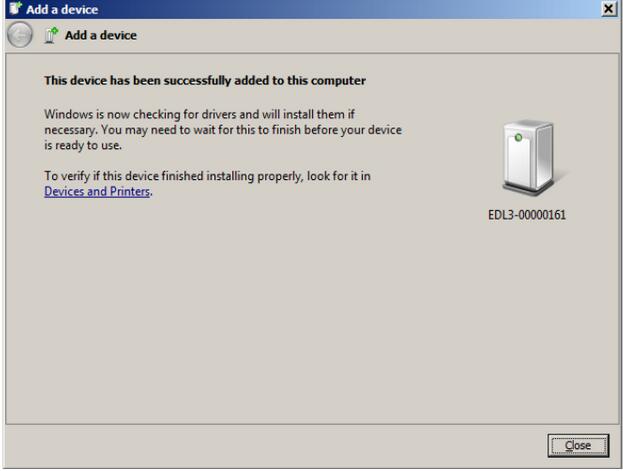
NOTE:You may be prompted to enter a pairing code for the device. If you are prompted to enter a PIN or pairing code, enter NEXIQ (all uppercase).

The following System Tray message is displayed.
Your device is ready to use.
(6)Click Close.
5. Making a Wireless Wi-Fi Connection
When using Wi-Fi, the EDL3 can be configured for either of the following modes:
• Mini Access Point, the Wi-Fi default
• Infrastructure
NOTE:EDL3 cannot be used in Infrastructure mode until it has been configured using the EDL3 Explorer utility (see Using the EDL3 Explorer in Chapter 3 of this manual).
6. Mini Access Point Mode
The easiest and quickest way to connect your EDL3 to your PC is Mini Access Point mode. In Mini Access Point mode (also known as Access Point Emulation mode), the PC communicates directly with the EDL3. The EDL3 emulates the function of an access point, allowing the PC to connect directly to the EDL3, as if it were an access point. When the PC is connected to the EDL3 in Mini Access Point mode, neither device is connected to the company network.
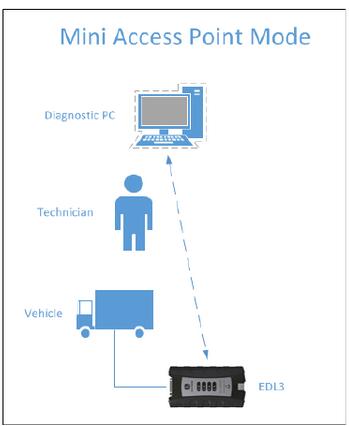
To connect the EDL3 to your PC using Mini Access Point Mode:
(1)Connect the DB26 female end of the appropriate adapter cable to the connector on the top of the EDL3.
(2)Attach the other end of the adapter cable (i.e., the Deutsch connector end) to the vehicle’s diagnostic connector.
NOTE:The vehicle’s diagnostic connector is typically located under the dashboard on the driver’s side, or beside the driver’s seat. It can also be located in the engine compartment, near the electronic control unit (ECU).
—At this point, the Power LED (green) on the EDL3 should be illuminated (On).
—If the Power LED is not illuminated, turn the vehicle’s key to the ON position, leaving the engine Off.
(3)Press and hold the Reset Button for about ten (10) seconds to switch from
Bluetooth Mode (the factory default) to Mini Access Point Mode.All of the LEDs on the device will flash momentarily to indicate that the device has been reconfigured. Once the connection is complete, the Wireless LED will display white to indicate Wi-Fi Mini Access Point Mode.
NOTE:See Device Features in Chapter 2 of this manual for a detailed discussion of the Reset Button.
(4)Navigate to the System Tray on your PC.

(5)Click on the Network icon in the System Tray.
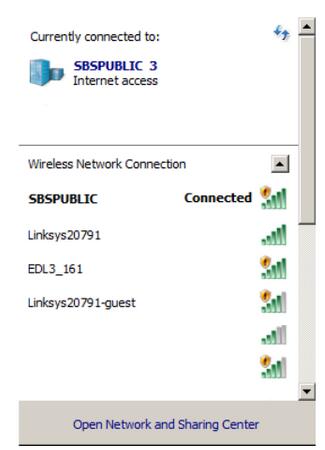
The Network Selection screen is displayed.
(6)Select EDL3_xxxxxx from the list (where xxxxxx is the serial number of the EDL3).
NOTE:If EDL3_xxxxxx is not displayed, make sure you are connected to the vehicle. Also, make sure you are within range (i.e., within 100 ft.). You may need to move your PC closer to the vehicle.
Selection-Highlighted
EDL3_xxxxxx is highlighted.
(7)Click Connect.
The device is now connected and ready to use.
7. Infrastructure Mode
In Infrastructure mode, your PC communicates with your company’s computer network through a Wireless Access Point (not included), which acts as a bridge between the wireless network and the wired network. In this mode, the EDL3 is configured to communicate with the same access point. All communication between the PC and the EDL3 passes through the access point.
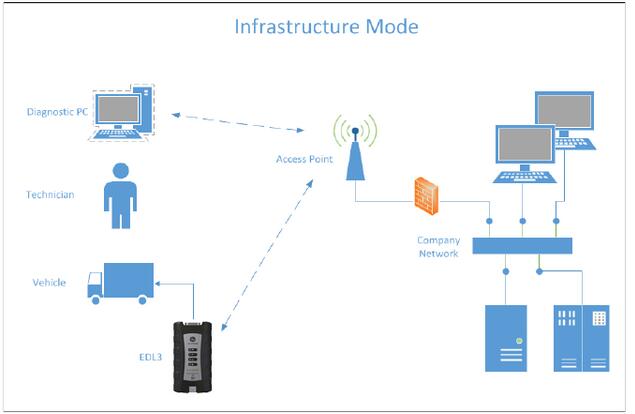
NOTE:The settings for connecting to your company network may differ from one installation to another. To ensure network security, your Information Tech-nology (IT) administrator will need to oversee the installation and specify the appropriate configuration parameters. Your IT administrator should be able to properly configure the Heavy Duty Truck diagnostic Scanner EDL3 for infrastructure mode, using the EDL3 Explorer utility (see Switching Modes: Mini Access Point and Infra-structure on page 46 of this manual).
Leave a Reply