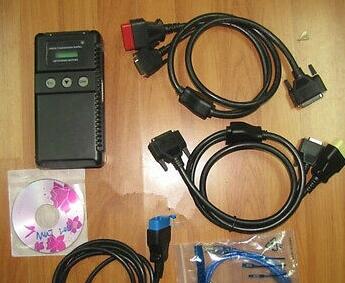
MUT 3= Mitsubishi MUT III Diagnostic System with VCI MB991824
This includes module reprogramming, key programming, and many other functions. This is the same tool used by Mitsubishi dealerships with the same level of functionality. The MUT III is a PC based Scan Tool that utilizes a USB equipped PC.
Mitsubishi MUT 3 image:
How to use mb991958 scan tool mut iii:
Part 1: Mitsubishi MUT 3 customization
Part 2: Mitsubishi MUT 3 coding
Part 3: Mitsubishi MUT 3 ecu reprogramming
in detail…
Part 1: How to use Mitsubishi MUT 3 VCI for customized settings
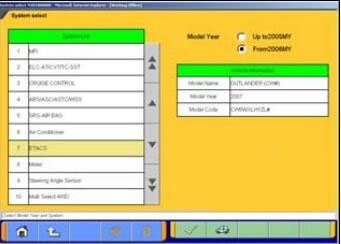
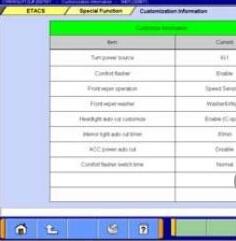
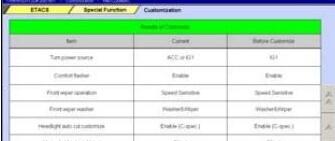
Confirm the current customization data
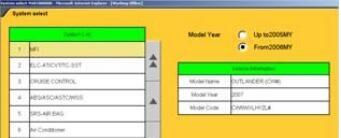
Select “ETACS” on the System Selection screen
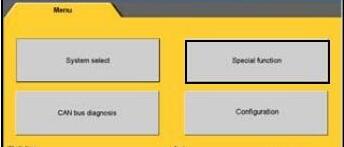
Press Special Function button
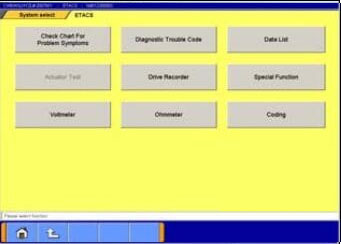
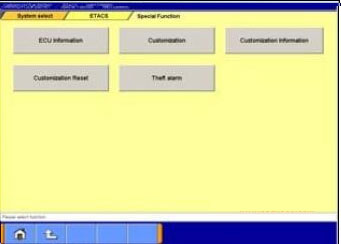
Special function menu is displayed
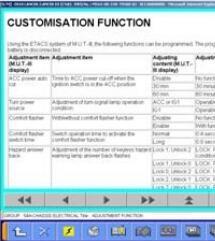
Customization – Writing a customization data
Customization Information – Reading the current customization data and saving the data to file
The current customization data is displayed
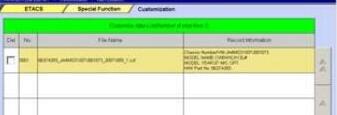
Save data
Save customization data

Confirm the displayed name which the saved file.
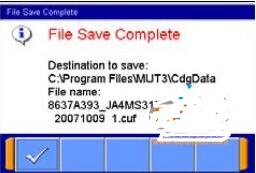
The file name of the saved file is set as ”ECU parts No., Date and No.”
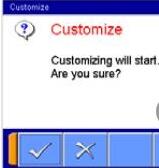
Customizing….
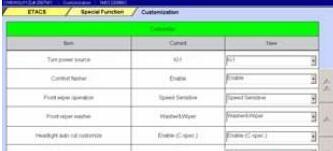
The current customization data and the customization data to be written are displayed.
Load the customization data file or change the value
Start customizing
Customizing has been completed

Written the customization data is displayed.
Check if the customization data is written correctly
Load the customization data
The applied customization files by the inputted are displayed.
Choose a customization file to be written
Note: -The background color of the line containing the selected file changes into yellow.
Delete customized files
To delete a data file loaded on the PC, click the check box next to file No. in the file list to place a check mark, then press the button at the bottom right corner
Load Customization items List (Not available in US)
Input vehicle information where you want to confirm the customization function.
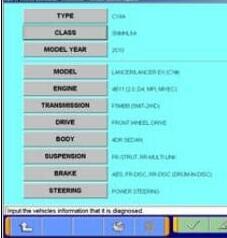
The relative page for the customization items is displayed
* A vehicle after 10MY is a target
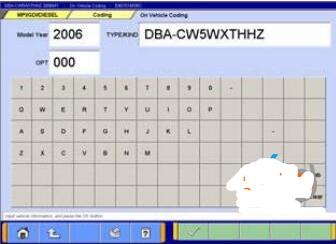
Part 2: How to use MUT 3 tester for Mitsubishi coding
Confirm the current coding data
Select “MFI” on the System Selection screen.
(For instruction on how to select a system, refer to 3-3-1)
Note:
As a typical example, procedure for Coding MFI is explained below.
Other system may have different menu structure but procedure is basically the same.
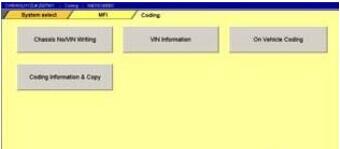
Press coding button
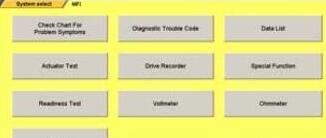
Coding menu is displayed
On vehicle coding — Writing coding data
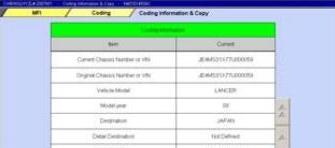
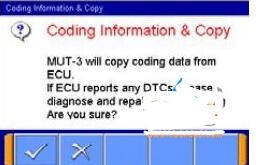
Coding information & copy — Reading the current ECU coding data and saving the data to file
The current ECU coding data is displayed
Save ECU coding data
Note:
If diagnostic trouble codes are currently stored in the ECU, the file cannot save. Retry after the vehicle is repaired.
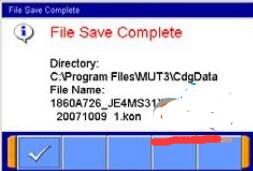
Confirm the displayed name which the saved file.
Note:
The file name of the saved file is set as ”ECU parts No., VIN No., Date and No.”
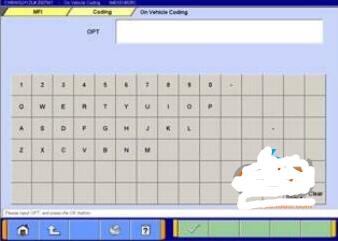
Variant Coding Writing
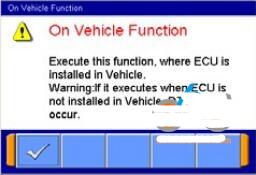
Yes! Execute this function where ECU is installed on the vehicle
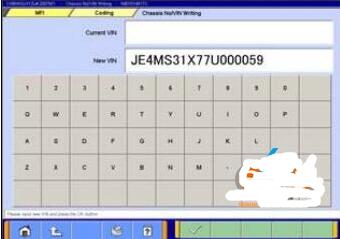
Input a VIN to list up applied coding files and press
If left screen is displayed, press tick button
Note:
-Don’t change each value in this screen
Note:
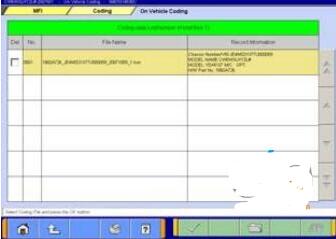
If coding file is not found in the folder, left screen may appear. In such case, press back button. button. Save the correct file in the folder and try again.
The applied coding files by the inputted are displayed. Choose a coding file to be written
-The background color of the line containing the selected file changes into yellow.
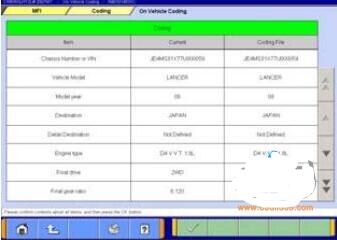
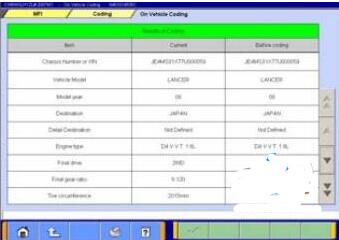
The current ECU coding data and the coding data to be written are displayed.
Confirmation dialog box appears
Note:
-In case of ETACS, “ETACS customize” and “Option Coding” are initialized after writing variant coding. Rewrite them after finishing coding.
-It is not need that “Option Coding” is executed because the data of “Option coding” includes in variant coding data, if “Copy Coding” was executed.
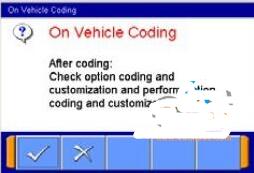
Coding is completed!
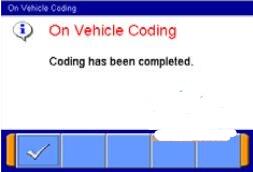
Written the coding data is displayed. Check if the coding data is written correctly.
Delete coding data
To delete a data file loaded on the PC, click the check box next to file No. in the file list to place a check mark
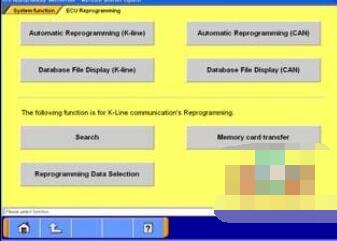
Part 3: How to use mut-3 VCI for Mitsubishi ecu reprogramming
Reprogramming with V.C.I. alone
(Not supported by V.C.I.-Lite)
Data Transfer (PC –> Memory Card)
Start up the M.U.T.-III system
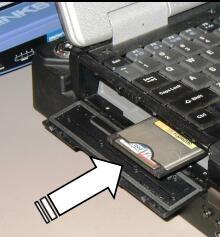
Insert the Memory card (MB991853, MB992228) into the Card Adaptor (MB991939), and then insert them into m-card slot on PC.
Press Special Function button on STV Top Menu
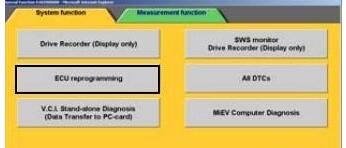
Select System Function tab and press ECU reprogramming button
Caution:
-In case an update CD-ROM is set in the PC with update undone, data update starts
Press Memory card transfer button
ALL reprogramming data in the M.U.T.-III PC are transferred to the memory card.
Caution:
-Do not remove the memory card from PC.
Select a memory card drive to start transferring

It transfers data to the memory card. Are you ready?

Data transferring…
The progress bar is displayed during the transfer.
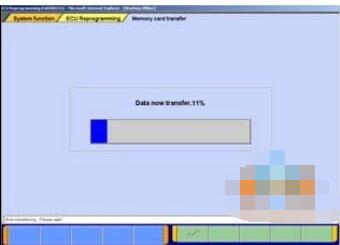
The data transfer is complete

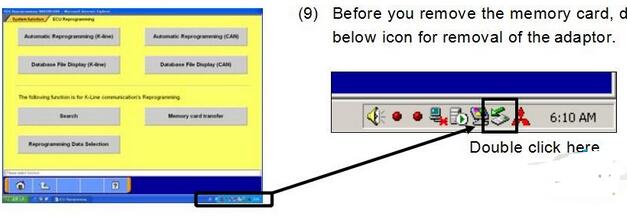
Before you remove the memory card, double-click the below icon for removal of the adaptor.
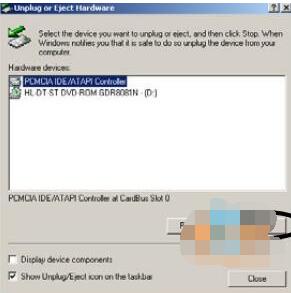
Select [PCMCIA IDE/ATAPI Controller] or the other appropriate devices, then stop
Verify the contents of the selection, then OK
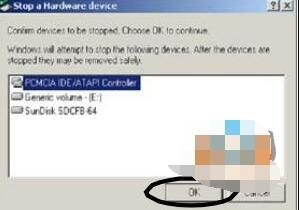
After displayed the message “The device can now be safely removed from the system”, push the lever on the side of PC card slot and remove the memory card.

Caution:
Do not remove the memory card away unless complete above method or turn off the PC.
Set up equipment
(1)Insert the Memory card (MB991853, MB992228), which is storing the reprogramming data, into the Card adaptor (MB991939) and insert them into V.C.I. main unit (MB991824)
(2)Connect M.U.T.-III Main Harness B (MB991911) or
A (MB991910) to V.C.I. main unit securely. (Refer to 10-2.) Note:
Select appropriate harness by instruction below.
-Main harness A: For vehicle only equipping 16 pin data-link-connector.
-Main harness B: For other vehicles.
-Adaptor harness (12-13): Outlander, Montero (after ‘02MY) (To connect Main harness B and 13pin data-link-connector)
(3)After verifying the ignition switch position at LOCK (OFF), connect the M.U.T.-III Main harness B or A to the data-link- connector.
(4)Turn Ignition switch on, and turn V.C.I. main switch on. (Do not start engine)
Retrieve Data (Memory card –> V.C.I.)
(a). Automatic Data Retrieval
(b). Select and Load Data
(c). (special case)
Retrieve Automatic Data
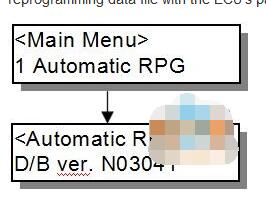
(1)Select “Automatic RPG” in main menu and press Enter key. Version No. of data base file appears.
By waiting 10sec or pressing Enter key, V.C.I starts communicating with ECU and retrieves reprogramming data file with the ECU’s parts No. and ROM-ID.
(2)The appropriate reprogramming data file No. is displayed. Pressing Enter key starts transferring the data file into V.C.I built-in-memory.

Remark:
*To search another data, press Esc key. If another appropriate reprogramming data exist, it will be displayed.
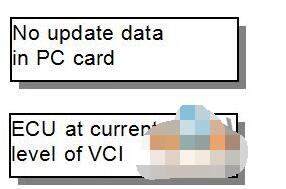
*The message bellows are displayed depends on ECU parts No, ROM-ID and condition of ECU. Press Enter Key to move back to Main menu.
“No update data in PC card”
This message appears if no pertinent reprogramming data exists. No data will be transferred.
“ECU at current level of VCI”
This message appears if the ECU has been already reprogrammed. No data will be transferred.
(3)Progress is displayed on the monitor.
* mark is increased by steps.

(14) After completing data transfer, ECU reprogramming starts sequentially

Select and load data
Select “Load RPG file” in main menu

Select a reprogramming data file
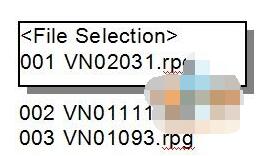
Esc key: Move back to main menu.
Remark:
-The data files are displayed in numeric order of data No.. (From big to small; new to old)
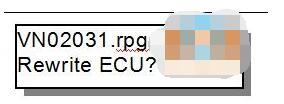
Reconfirm the data file No., and press Enter key to start transferring the data into V.C.I. built-in-memory.
Esc Key: Cancel
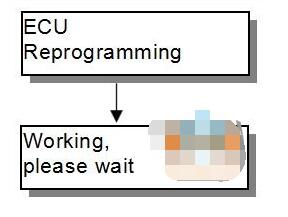
Progress is displayed on monitor
* mark is increased by steps

After completing data transfer, ECU reprogramming starts sequentially
Special case:
If V.C.I. has already stored the reprogramming data, select “ECU Reprogram” in main menu, and press Enter key

Reprogramming data file No. and program version No. in the V.C.I. memory are displayed for a few seconds, and then ECU reprogramming starts sequentially.
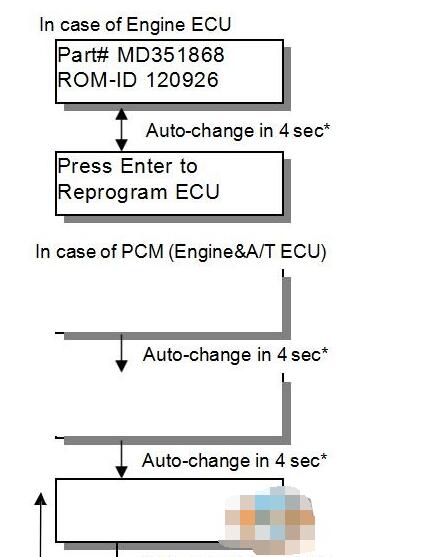
Reprogramming ECU…(VCI to vehicle ECU)
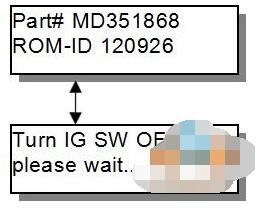
ECU parts No. and ROM-ID No. are displayed. Press Enter key to start reprogramming.
Note:
-Reprogramming must carry out on the condition of engine stop and IG switch on.
Do not disconnect harness/ turn off the IG switch during ECU reprogramming.
[Messages before/during reprogramming process]
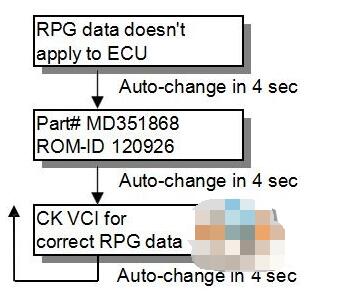
a)“RPG data doesn’t apply to ECU”
Reprogramming stopped owing to the data in V.C.I. memory being not appropriate for the ECU.
?Note down the displayed ECU parts No. and ROM-ID.
?Restart V.C.I. by pressing Enter key, and confirm the matching of the data file No, which is displayed by reboot, and the ECU part No./ ROM-ID for reprogramming.
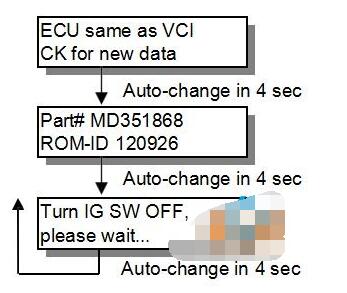
“ECU Programming Tool same as VCI, CK for new data” (CK; check) Reprogramming stopped because reprogramming has been already done
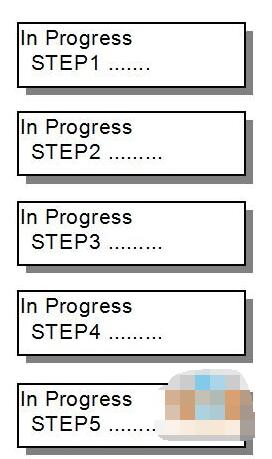
5 steps progress is displayed while reprogramming
Caution:
?Do not press any key during reprogramming automatically proceeding.
?Do not turn off V.C.I. power or IG switch during reprogramming.
STEP1: Saving the data to the back up memory.
STEP2: Erasing data in ECU.
STEP3: Writing reprogramming data
STEP4: Verifying the data between ECU and V.C.I.
STEP5: Erasing diagnosis code and back up memory
On completion of the 5 steps, new reprogrammed ECU parts No. and ROM-ID are displayed.
Turn IG switch LOCK(OFF)
Note:
Diagnosis code might be memorized in ECU if without turning IG switch Lock (off)
ECU reprogramming completed

Verify the system properly operated by starting engine. Enter key: V.C.I. restart.
Leave a Reply